

이 스터디는 CloudNet@에서 진행하는 T101 스터디를 참여하면서 공부하는 내용을 기록하는 블로그 포스팅입니다.
CloudNet@에서 제공해주는 자료들과 테라폼으로 시작하는 IaC 를 바탕으로 작성되었습니다.
Terraform Runner
Terraform Runner란 인프라스트럭처 코드(Infrastructure as Code, IaC)를 실행하고 관리하기 위해 사용되는 도구로서, 주로 Terraform 스크립트를 자동으로 실행하거나 CI/CD 파이프라인에 통합하기 위해 사용됩니다. Terraform 설정 파일(.tf)을 자동으로 실행하여 인프라를 프로비저닝하고, Terraform의 상태 파일(.tfstate)을 관리하여 인프라의 현재 상태를 추적하고, 변경 사항을 적용합니다.
Atlantis

atlantis는 대표적인 Terraform Runner로서, GitHub, GitLab, Bitbucket과 같은 Git 저장소와 통합되어 PR(풀 리퀘스트) 기반의 워크플로우를 통해 Terraform 변경 사항을 자동으로 검토하고 적용할 수 있게 해주는 도구입니다.
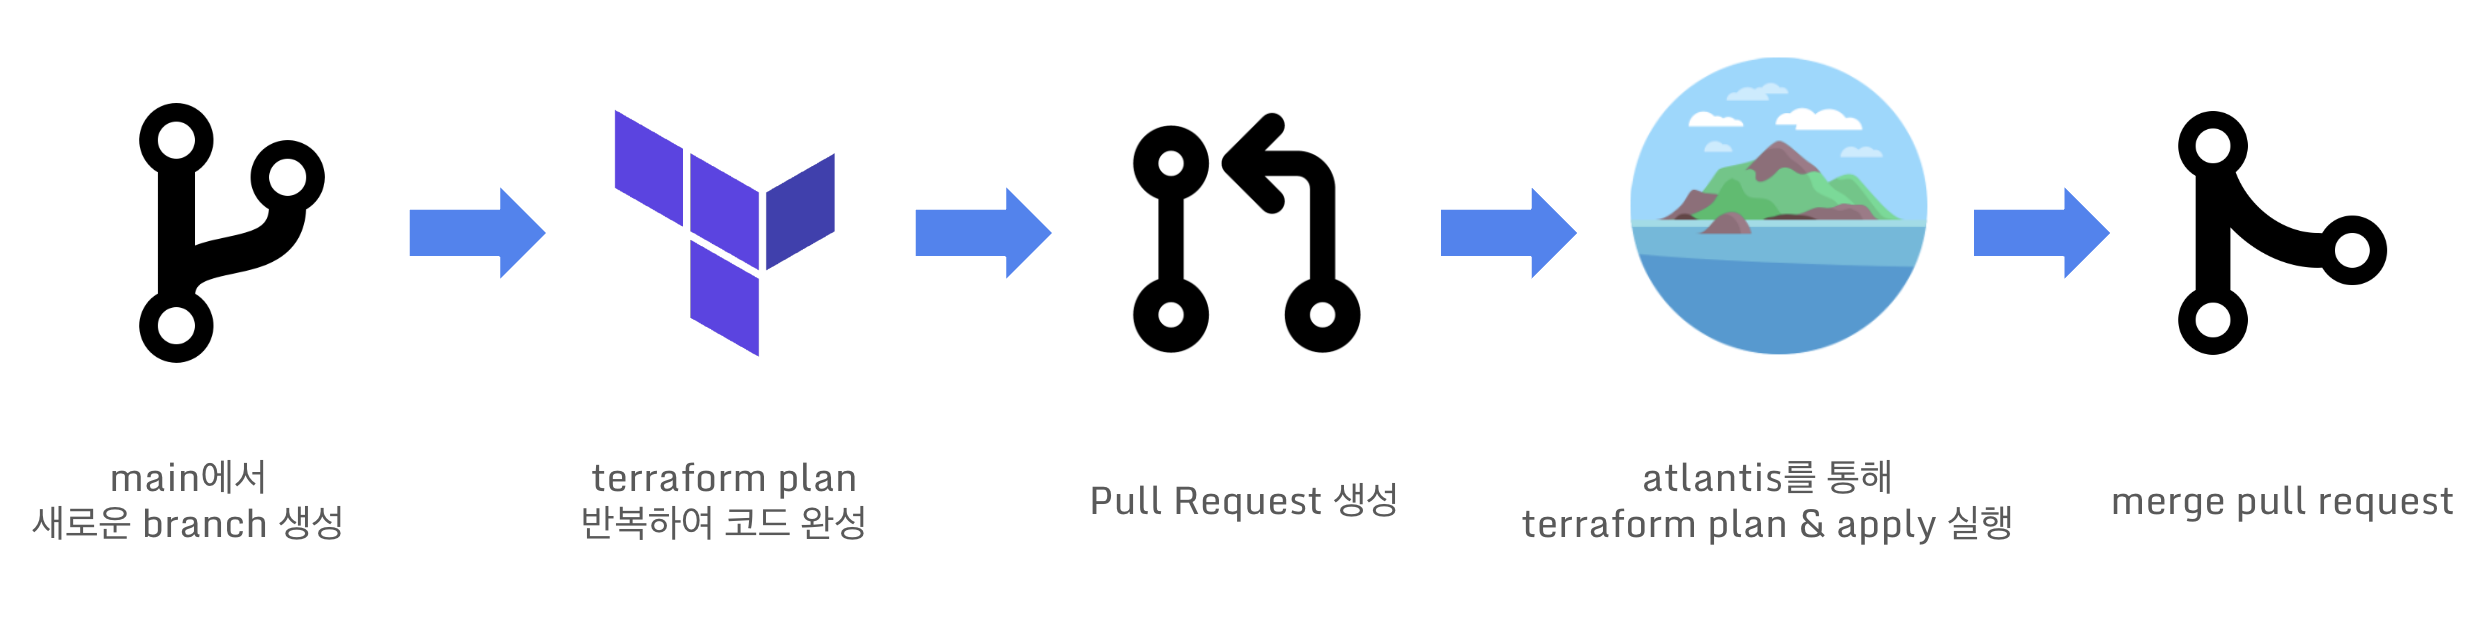
Atlantis 사용하기
Atlantis는 영구 스토리지가 없고 VCS에 새로운 tfstate 파일을 다시 commit하지 않기 문에 로컬 상태를 제외한 모든 backend 유형을 지원합니다.
Repository 구조
Repo root 에서 단일 Terraform 프로젝트
.
├── main.tf
└── ...
Multiple Project Folders
.
├── project1
│   ├── main.tf
|   └── ...
└── project2
    ├── main.tf
    └── ...
Modules
.
├── project1
│   ├── main.tf
|   └── ...
└── modules
    └── module1
        ├── main.tf
        └── ...
Terraform Workspaces
Terraform 버전이 >= 0.9.0 인 경우 Atlantis는 Atlantis.yaml 파일을 통해 workspace를 지원하며, 이 파일을 통해 Atlantis가 workspace를 알 수 있게 됩니다.
.tfvars Files
.
├── production.tfvars
│── staging.tfvars
└── main.tf
Atlantis가 .tfvars 파일로 자동으로 plan을 실행할 수 있게 하려면 -var-file={YOUR_FILE}를 사용하라고 알려주는 atlantis.yaml 파일을 만들어야 합니다.
Multiple Repos
Atlantis는 한 Repo에 대해 구성된 webhook가 있다면, 여러 Repo도 지원합니다.
Terraform Versions
Atlantis는 모든 Terraform 버전을 지원하며, 서로 다른 저장소/프로젝트에 대해 서로 다른 버전을 사용하도록 구성할 수 있습니다.
Git 호스트에 대한 액세스 자격 증명 생성(GitHub, GitLab, 등등…)
Git Host Access Credentials
Atlantis가 API 호출에 사용할 Git 호스트(GitHub, GitLab, Gitea, Bitbucket 또는 Azure DevOps)에 대한 자격 증명을 만드는 방법에 대해 살펴보겠습니다.
Create an Atlantis user(선택)
Atlantis가 작성하는 모든 comment는 이 사용자가 작성하기 때문에 협업을 할 시에 혼란을 줄 수 있기에 @atlantis라는 새 User를 생성하거나 CI 전용 User를 사용하는 것이 좋습니다. (하지만 필수는 아닙니다.)

Access Token 생성
위의 내용에서 생성된 사용자에게 권한을 부여하기 위해서 Git에서 Access Token을 발급 받아야 합니다.
Webhooks 설정
Atlantis가 사용자의 Pull Request에 응답할 수 있도록 Git 호스트에서 Webhook을 구성합니다.
Provider credentials 설정
Atlantis가 terraform plan 후 apply하면서 local에서 테라폼 명령어를 실행할 때처럼 provider에 대한 자격 증명이 필요합니다. 여러 방법이 있는데 AWS의 경우엔 AWS_ACCESS_KEY를 사용하거나, ~/.aws/credentials에 설정 정보를 작성하거나 Role등 다양한 방법이 존재합니다.
provider "aws" {
  assume_role {
    role_arn     = "arn:aws:iam::ACCOUNT_ID:role/ROLE_NAME"
    session_name = "${var.atlantis_user}-${var.atlantis_repo_owner}-${var.atlantis_repo_name}-${var.atlantis_pull_num}"
  }
}
terraform {
  backend "s3" {
    bucket   = "mybucket"
    key      = "path/to/my/key"
    region   = "us-east-1"
    role_arn = "arn:aws:iam::ACCOUNT_ID:role/ROLE_NAME"
    # can't use var.atlantis_user as the session name because
    # interpolations are not allowed in backend configuration
    # session_name = "${var.atlantis_user}" WON'T WORK
  }
}
실습 - Atlantis
AWS EC2 생성
CloudFormation 스택 배포
AWSTemplateFormatVersion: '2010-09-09'

Metadata:
  AWS::CloudFormation::Interface:
    ParameterGroups:
      - Label:
          default: "<<<<< Deploy EC2 >>>>>"
        Parameters:
          - KeyName
          - SgIngressSshCidr
          - MyInstanceType
          - LatestAmiId

      - Label:
          default: "<<<<< Region AZ >>>>>"
        Parameters:
          - TargetRegion
          - AvailabilityZone1
          - AvailabilityZone2

      - Label:
          default: "<<<<< VPC Subnet >>>>>"
        Parameters:
          - VpcBlock
          - PublicSubnet1Block
          - PublicSubnet2Block

Parameters:
  KeyName:
    Description: Name of an existing EC2 KeyPair to enable SSH access to the instances.
    Type: AWS::EC2::KeyPair::KeyName
    ConstraintDescription: must be the name of an existing EC2 KeyPair.
  SgIngressSshCidr:
    Description: The IP address range that can be used to communicate to the EC2 instances.
    Type: String
    MinLength: '9'
    MaxLength: '18'
    Default: 0.0.0.0/0
    AllowedPattern: (\d{1,3})\.(\d{1,3})\.(\d{1,3})\.(\d{1,3})/(\d{1,2})
    ConstraintDescription: must be a valid IP CIDR range of the form x.x.x.x/x.
  MyInstanceType:
    Description: Enter EC2 Type(Spec) Ex) t3.micro.
    Type: String
    Default: t3.medium
  LatestAmiId:
    Description: (DO NOT CHANGE)
    Type: 'AWS::SSM::Parameter::Value<AWS::EC2::Image::Id>'
    Default: '/aws/service/canonical/ubuntu/server/22.04/stable/current/amd64/hvm/ebs-gp2/ami-id'
    AllowedValues:
      - /aws/service/canonical/ubuntu/server/22.04/stable/current/amd64/hvm/ebs-gp2/ami-id

  TargetRegion:
    Type: String
    Default: ap-northeast-2
  AvailabilityZone1:
    Type: String
    Default: ap-northeast-2a
  AvailabilityZone2:
    Type: String
    Default: ap-northeast-2c

  VpcBlock:
    Type: String
    Default: 10.10.0.0/16
  PublicSubnet1Block:
    Type: String
    Default: 10.10.1.0/24
  PublicSubnet2Block:
    Type: String
    Default: 10.10.2.0/24

Resources:
# VPC
  TerraformVPC:
    Type: AWS::EC2::VPC
    Properties:
      CidrBlock: !Ref VpcBlock
      EnableDnsSupport: true
      EnableDnsHostnames: true
      Tags:
        - Key: Name
          Value: Terraform-VPC

# PublicSubnets
  PublicSubnet1:
    Type: AWS::EC2::Subnet
    Properties:
      AvailabilityZone: !Ref AvailabilityZone1
      CidrBlock: !Ref PublicSubnet1Block
      VpcId: !Ref TerraformVPC
      MapPublicIpOnLaunch: true
      Tags:
        - Key: Name
          Value: Terraform-PublicSubnet1
  PublicSubnet2:
    Type: AWS::EC2::Subnet
    Properties:
      AvailabilityZone: !Ref AvailabilityZone2
      CidrBlock: !Ref PublicSubnet2Block
      VpcId: !Ref TerraformVPC
      MapPublicIpOnLaunch: true
      Tags:
        - Key: Name
          Value: Terraform-PublicSubnet2

  InternetGateway:
    Type: AWS::EC2::InternetGateway
  VPCGatewayAttachment:
    Type: AWS::EC2::VPCGatewayAttachment
    Properties:
      InternetGatewayId: !Ref InternetGateway
      VpcId: !Ref TerraformVPC

  PublicSubnetRouteTable:
    Type: AWS::EC2::RouteTable
    Properties:
      VpcId: !Ref TerraformVPC
      Tags:
        - Key: Name
          Value: Terraform-PublicSubnetRouteTable
  PublicSubnetRoute:
    Type: AWS::EC2::Route
    Properties:
      RouteTableId: !Ref PublicSubnetRouteTable
      DestinationCidrBlock: 0.0.0.0/0
      GatewayId: !Ref InternetGateway
  PublicSubnet1RouteTableAssociation:
    Type: AWS::EC2::SubnetRouteTableAssociation
    Properties:
      SubnetId: !Ref PublicSubnet1
      RouteTableId: !Ref PublicSubnetRouteTable
  PublicSubnet2RouteTableAssociation:
    Type: AWS::EC2::SubnetRouteTableAssociation
    Properties:
      SubnetId: !Ref PublicSubnet2
      RouteTableId: !Ref PublicSubnetRouteTable


# EC2 Hosts
  EC2SG:
    Type: AWS::EC2::SecurityGroup
    Properties:
      GroupDescription: Terraform EC2 Security Group
      VpcId: !Ref TerraformVPC
      Tags:
        - Key: Name
          Value: Terraform-SG
      SecurityGroupIngress:
      - IpProtocol: '-1'
        CidrIp: !Ref SgIngressSshCidr
      - IpProtocol: tcp
        FromPort: 4141
        ToPort: 4141
        CidrIp: 0.0.0.0/0

  EC21:
    Type: AWS::EC2::Instance
    Properties:
      InstanceType: !Ref MyInstanceType
      ImageId: !Ref LatestAmiId
      KeyName: !Ref KeyName
      Tags:
        - Key: Name
          Value: Atlantis
      NetworkInterfaces:
        - DeviceIndex: 0
          SubnetId: !Ref PublicSubnet1
          GroupSet:
          - !Ref EC2SG
          AssociatePublicIpAddress: true
          PrivateIpAddress: 10.10.1.10
      BlockDeviceMappings:
        - DeviceName: /dev/sda1
          Ebs:
            VolumeType: gp3
            VolumeSize: 30
            DeleteOnTermination: true
      UserData:
        Fn::Base64:
          !Sub |
            #!/bin/bash
            hostnamectl --static set-hostname Atlantis

            # Config convenience
            echo 'alias vi=vim' >> /etc/profile
            echo "sudo su -" >> /home/ubuntu/.bashrc

            # Install Packages & Terraform
            wget -O- https://apt.releases.hashicorp.com/gpg | sudo gpg --dearmor -o /usr/share/keyrings/hashicorp-archive-keyring.gpg
            echo "deb [signed-by=/usr/share/keyrings/hashicorp-archive-keyring.gpg] https://apt.releases.hashicorp.com $(lsb_release -cs) main" | sudo tee /etc/apt/sources.list.d/hashicorp.list
            apt update -qq && apt install tree jq unzip zip terraform -y

            # Install aws cli version2
            curl "https://awscli.amazonaws.com/awscli-exe-linux-x86_64.zip" -o "awscliv2.zip"
            unzip awscliv2.zip
            sudo ./aws/install

            # Install atlantis
            wget https://github.com/runatlantis/atlantis/releases/download/v0.28.3/atlantis_linux_amd64.zip -P /root
            unzip /root/atlantis_linux_amd64.zip -d /root && rm -rf /root/atlantis_linux_amd64.zip

Outputs:
  eksctlhost:
    Value: !GetAtt EC21.PublicIp
위 CloudFormation 스택 코드에는 Terraform, AWS CLI, Git을 설치하는 스크립트까지 내장되어있어 실습을 편하게 진행하게끔 도와줍니다!
MYKEYNAME=<각자 자신의 AWS EC2 서울 리전 Keypair 이름>
aws cloudformation deploy --template-file t101-atlantis-ec2.yaml --stack-name t101 --parameter-overrides KeyName=$MYKEYNAME SgIngressSshCidr=$(curl -s ipinfo.io/ip)/32 --region ap-northeast-2
위의 코드와 명령어를 통해 CloudFormation 스택을 배포하도록 하겠습니다.

위와 같이 console에서 CloudFormation 스택이 생성되고 있음을 확인하실 수 있고, 배포되는데까지 대략 1~5분 정도 소요됩니다.


이 처럼 Successfully created/updated stack - t101가 반환되고 CloudFormation에서 확인해보면 CREATE_COMPLETE인 것을 확인하시게되면 EC2 배포는 완료되었습니다.
EC2 접근
그러면 이제 해당 EC2에 접근하여 AWS 자격증명을 설정합니다.
ssh -i {keypair} ubuntu@$(aws cloudformation describe-stacks --stack-name t101 --query 'Stacks[*].Outputs[0].OutputValue' --output text)
위의 코드를 통해 CloudFormation으로 배포한 EC2에 접근하실 수 있습니다.

AWS 자격증명 설정
EC2에 접속하셨다면 AWS 자격증명을 설정해주셔야 합니다. atlantis가 github의 PR을 통해 테라폼 명령어를 요청받으면 webhook으로 AWS 프로바이더를 사용해야 하기 때문입니다.
aws configure
AWS Access Key ID [None]: ####
AWS Secret Access Key [None]: ####
Default region name [None]: ap-northeast-2
Default output format [None]:
그 후 자격증명이 잘 설정되었는지 확인하기 위해 EC2의 Tag중 Name들을 출력하는 아래의 명령어를 실행해보겠습니다.
aws ec2 describe-instances --query 'Reservations[*].Instances[*].Tags[?Key==`Name`].Value' --output text
Terraform 버전 확인
terraform version
Git 버전 확인

도메인 노출 설정
Atlantis server와 github과 통신이 이루어져야 하기 때문에 Atlantis Server의 도메인을 노출시켜야 합니다. EC2는 ElasticIP를 할당되어있으니 확인 후 변수로 지정하도록 합니다.

port를 4141로 할당한 것은 Atlantis 애플리케이션이 실행될 때 4141 port를 할당받기 때문입니다. (현재는 애플리케이션을 배포하지 않았으니 통신 못합니닷!)
GitHub 설정
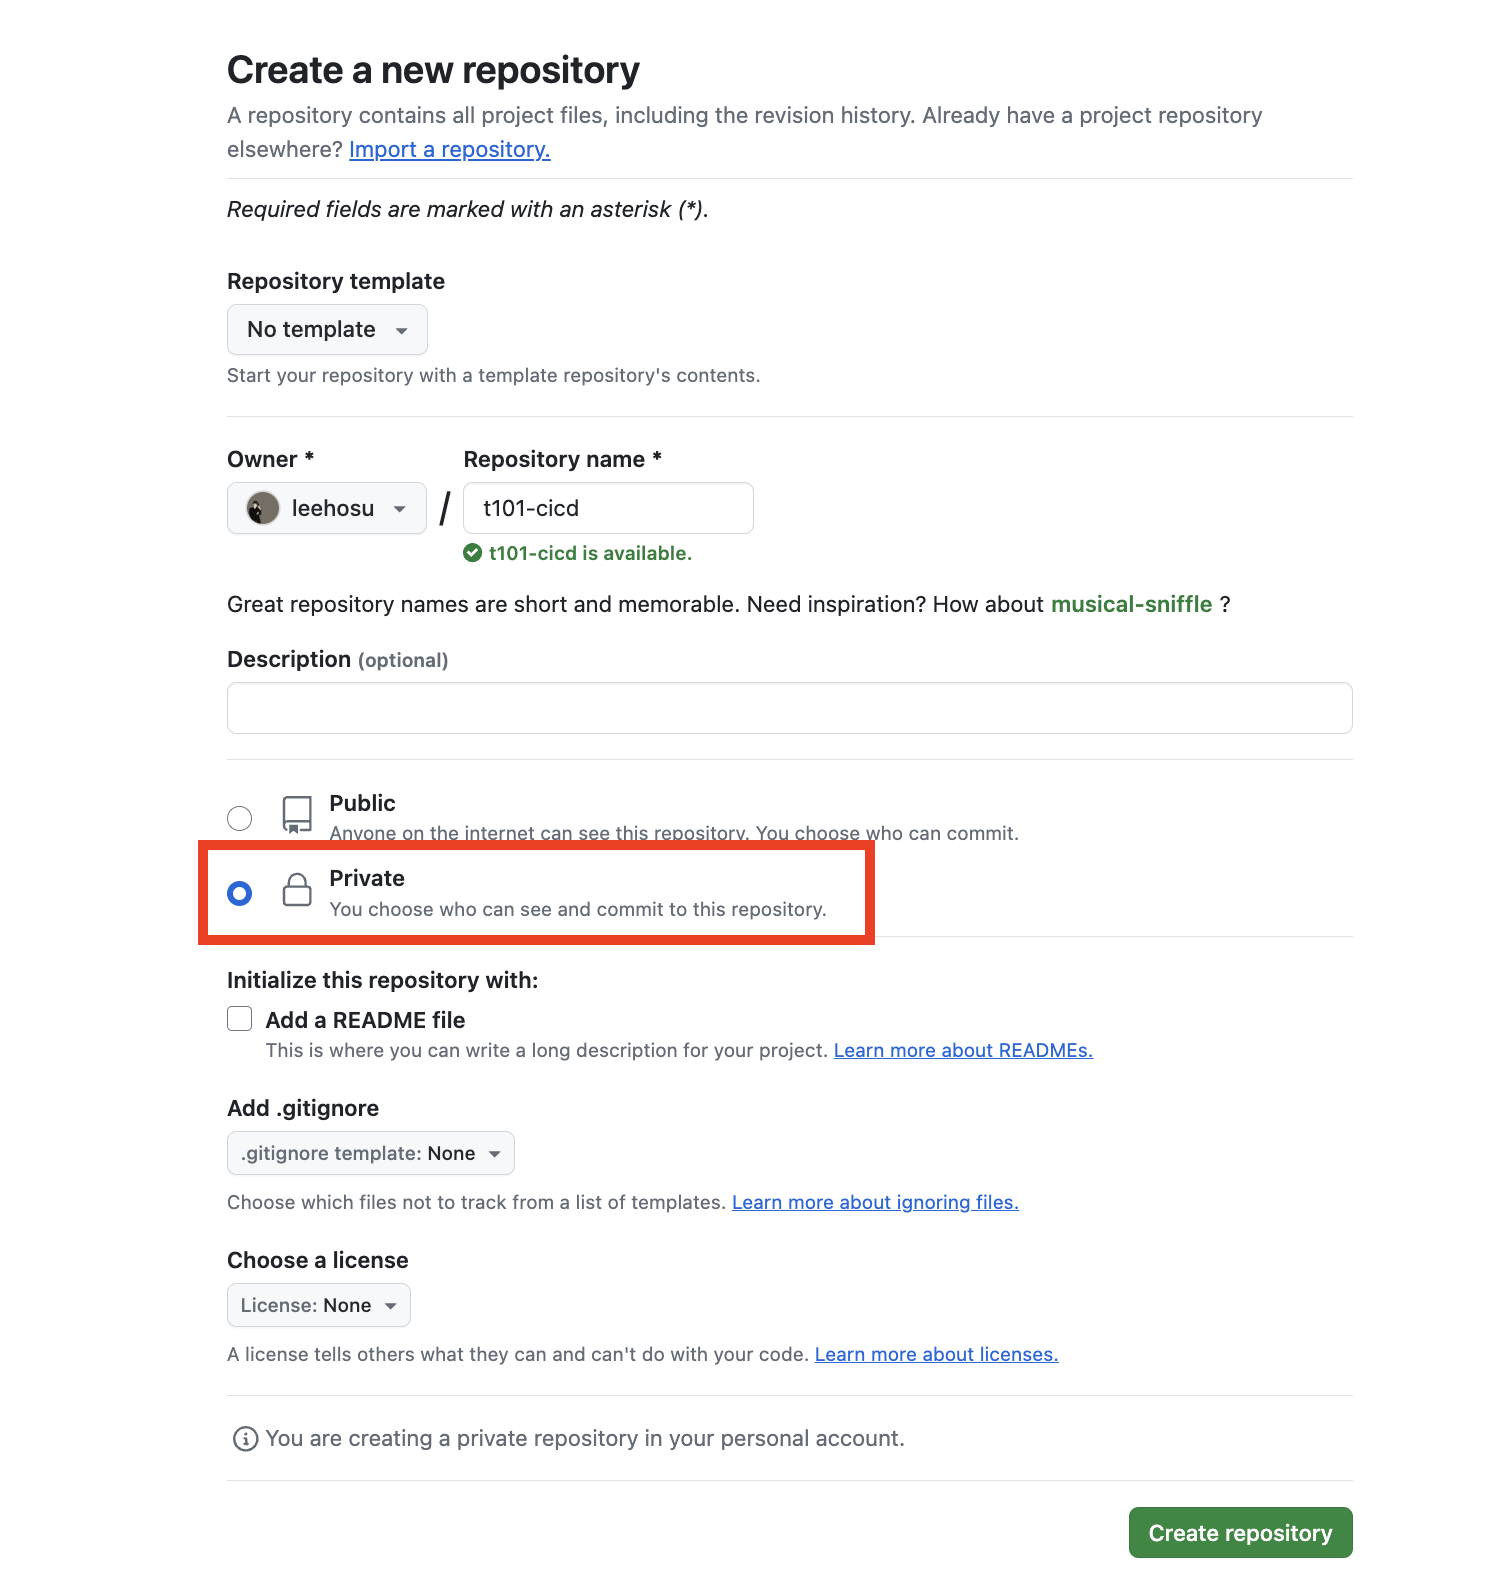
private repository 설정
Github Token 생성

위의 사진을 토대로 Profile -> Settings → Developer settings ⇒ Personal access tokens -> Tokens (classic) -> Generate New Token(classic) 의 경로로 설정해주시면 됩니다.

이때, 보안을 위해 Select Scope를 repo 범위로 제한합니다. 그렇게 설정을 마친 뒤 생성하게 되면 오른쪽의 사진과 같이 Token을 발급 받을 수 있습니다.
TOKEN="{YOUR_TOKEN}"발급 받은 Token을 변수로 지정합니다.
Atlantis Webhook Secret 생성
Atlantis가 Github의 Webhook을 통해 API를 요청 받는데, 이것에 대해 검증할 수 있도록 Webhook Secret을 생성합니다.
Webhook secrets are actually optional. However they're highly recommended for security.
- Webhook Secret은 실제로 선택 사항입니다. 그러나 보안을 위해 강력하게 권장됩니다. (공식페이지)
Generate Random Strings and Numbers 에서 랜덤으로 Secret값을 생성하도록 하겠습니다.
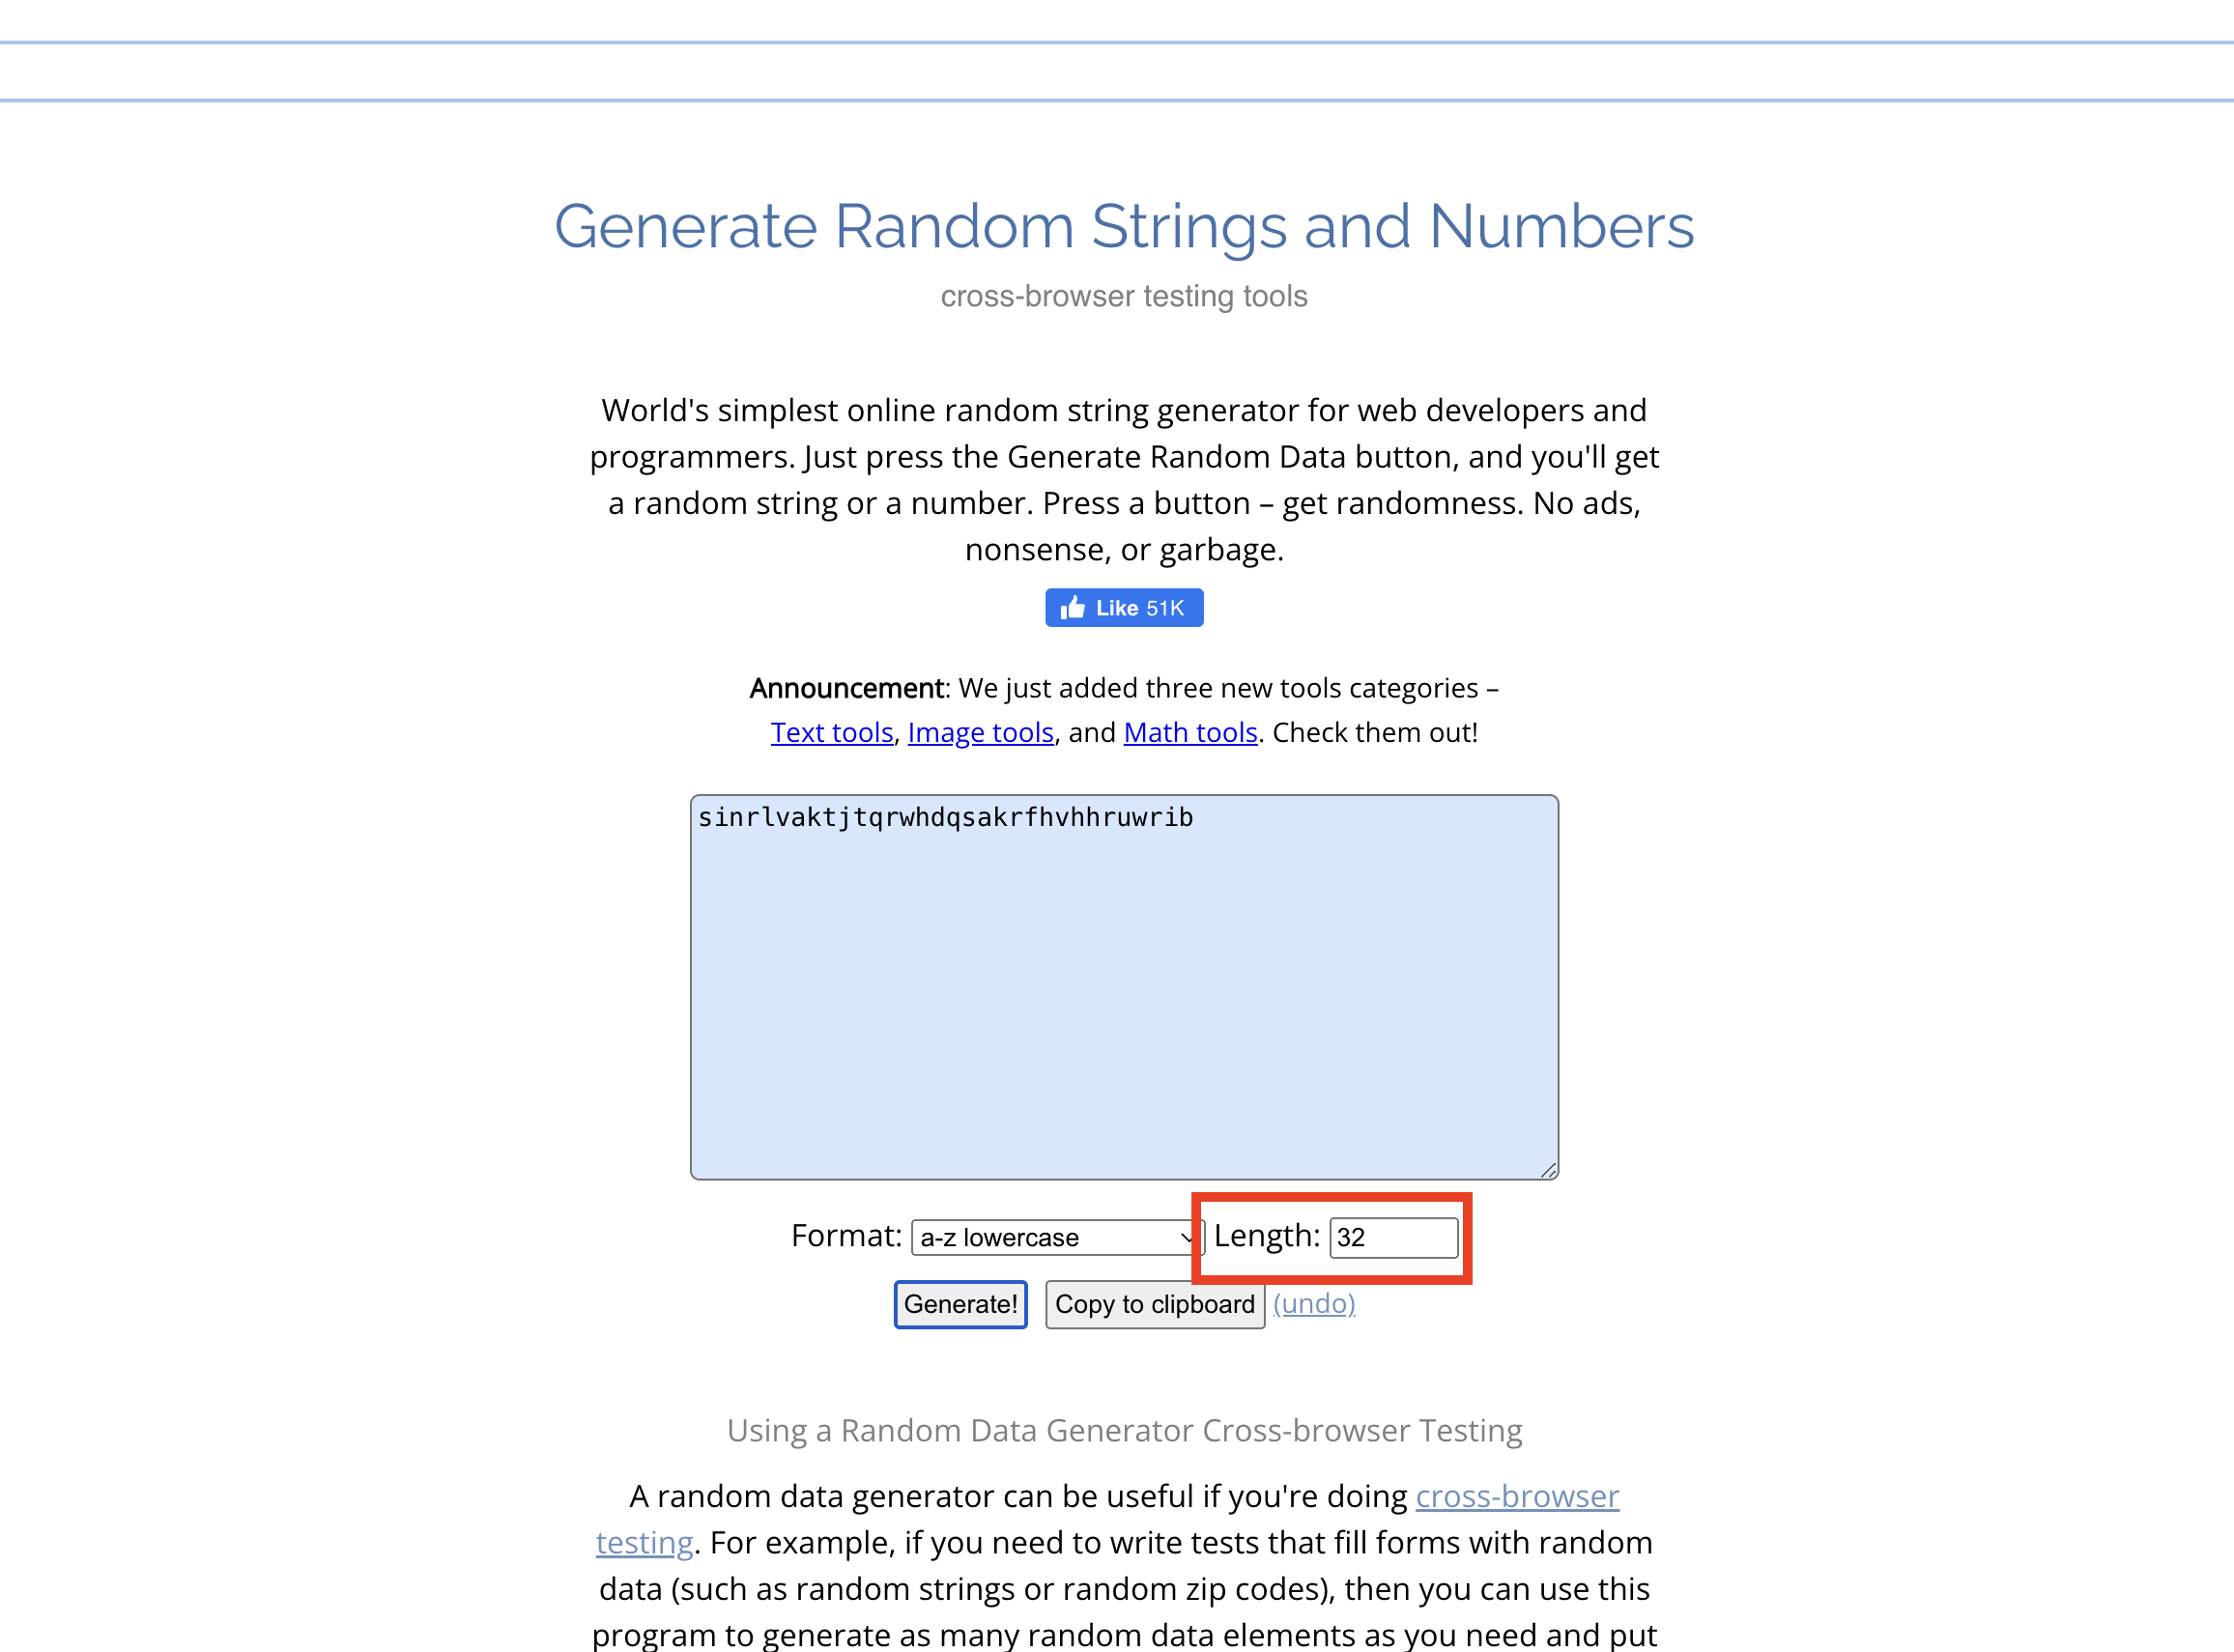
Length를 32로 설정한 후 Generate 버튼을 클릭하면 위의 사진처럼 32자리의 Secret 값이 랜덤하게 생성됩니다. 해당 Secret값은 하나의 repo에 대해서만 사용하는 것이 아닌 각 repo에 대해 동일한 웹 훅 비밀을 사용해야 합니다. (Atlantis Server는 한 곳으로 받아야 하기 때문)
Github Webhook Secret 생성

위에서 생성한 Private Repository에 접근하셔서 Settings > Webhooks > Add Webhook 버튼을 클릭합니다.
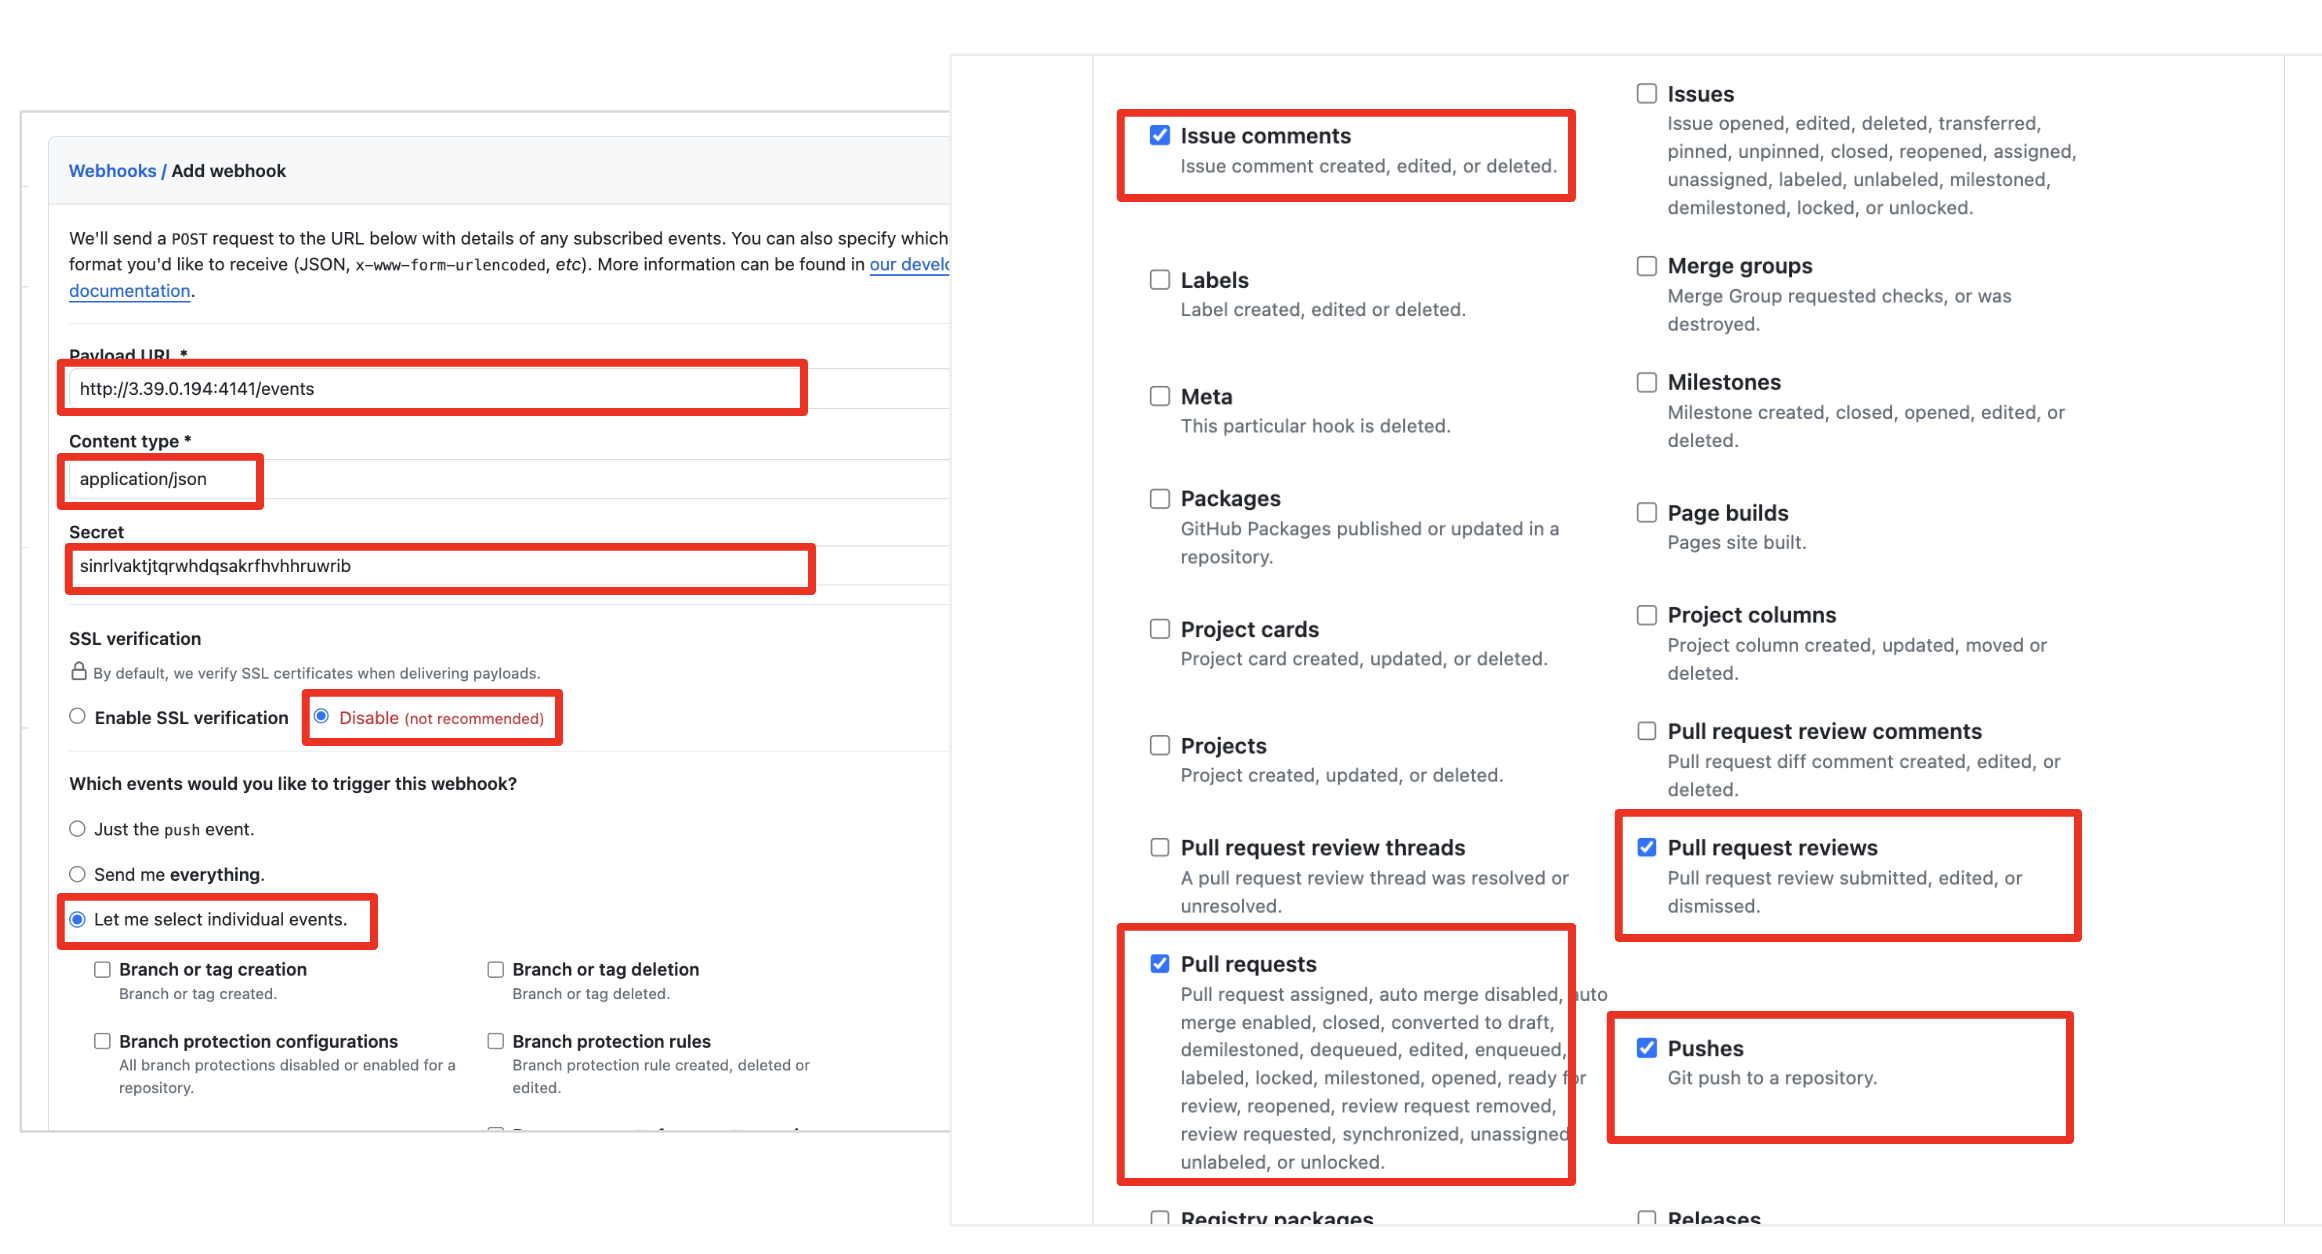
그 후 payload를 보내기 위한 Payload URL(http://<EC2공인IP>:4141/events)을 입력하고, Content Type은 application/json으로 선택하며 특히 Secret에 위에서 생성한 랜덤 secret 값을 입력해줍니다. 마지막으로 어떤 action에 trigger할 것인지 선택해주셔야 하는데, [Issue comments, Pull request reviews, Pushes, Pull requests] 를 선택합니다.
webhook 전송 테스트

이렇게 생성한 후 webhook 상태를 확인해보면 502 에러로 인해 ping 전송이 실패한 것으로 보입니다. 아직 Atlantis Server가 배포되어 있지 않으니 당연한 결과겠죠?
Atlantis 설치
Atlantis 배포를 위한 변수 설정
USERNAME="{the username of your GitHub, GitLab or Bitbucket user}"
REPO_ALLOWLIST="$YOUR_GIT_HOST/$YOUR_USERNAME/$YOUR_REPO"
USERNAME은 github username을 작성해주시면되고, REPO_ALLOWLIST는 REPO URL을 입력해주시면 됩니다. (ex.github.com/leehosu/t101-cicd)
URL="http://$(curl -s ipinfo.io/ip):4141"
USERNAME=leehosu
TOKEN='###'
SECRET='###'
REPO_ALLOWLIST="github.com/leehosu/t101-cicd"
총 5개의 값(URL, USERNAME, TOKEN, SECRET, REPO_ALLOWLSIT) 이 변수로 설정되어 있어야 합니다.
echo $URL $USERNAME $TOKEN $SECRET $REPO_ALLOWLIST위 명령어로 한 번에 확인 가능하니, 실행 후 빈 값이 나온다면 설정 후 진행해주시면 됩니다.
Atlantis 설치
Atlantis는 서버 환경에 맞게 설치가 가능합니다.
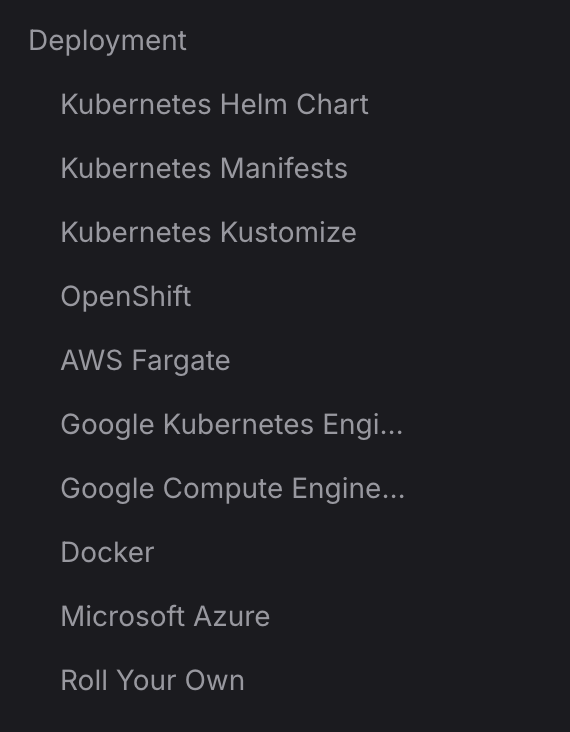
공식 페이지를 참고해보시면 여러 배포 방법이 소개되어있습니다. 저희는 이중에 Roll Your Own을 통해 설치하도록 하겠습니다.
./atlantis server \
--atlantis-url="$URL" \
--gh-user="$USERNAME" \
--gh-token="$TOKEN" \
--gh-webhook-secret="$SECRET" \
--repo-allowlist="$REPO_ALLOWLIST"

위의 사진처럼 실행 Log가 쫘르르 보여집니다.
Atlantis 서버 접속
새로운 터미널을 생성합니다.
URL="http://$(curl -s ipinfo.io/ip):4141"
echo $URL
위 명령어를 통해 외부에서 접근 가능한 IP를 확인한 후 4141 port를 붙여서 URL 변수로 지정한 후 해당 URL로 브라우저에서 접근합니다.

webhook 전송 테스트


위에서 Atlantis Server가 배포되어 있지 않았으니 webhook ping test가 실패했었는데요. Atlantis Server를 배포한 후 다시 test를 진행해보면 위의 사진과 같이 check 표시와 함께 ping test가 성공했음을 확인할 수 있습니다.
Atlantis를 이용한 AWS IAM 생성
AWS S3 Bucket 생성
aws s3 mb s3://<각자 유일한 S3 버킷명 이름> --region ap-northeast-2위의 명령어로 S3 Bucket을 하나 생성합니다.

Git clone
git clone ${REPO}위에서 생성해놓은 Private Repository를 통해 Atlantis 실습을 하기 위해 해당 Repository를 local로 Clone합니다.
Git branch 생성
git checkout -b iam
iam에 관한 작업을 할 예정이니 iam branch를 생성해줍니다.
Terraform code
mkdir iam & cd iamterraform을 활용하여 iam 작업을 진행할 디렉토리를 생성합니다.
terraform {
  backend "s3" {
    bucket = "<각자 자신의 S3 버킷 이름>"
    key    = "terraform.tfstate"
    region = "ap-northeast-2"
  }
}

resource "aws_iam_user" "myuser" {
  name = "t101user"
}
그 후 main.tf 파일을 생성하여 AWS에 IAM 유저를 생성하고, Terraform 상태 파일을 S3 버킷에 저장하도록 설정하도록 하는 코드를 위와 같이 작성합니다.
Git Push
git add main.tf && git commit -m "add main.tf" && git push origin iam작업한 내용을 iam branch에 push 합니다.
Atlantis 확인 - 1
watch -d tree .atlantis/
위의 명령어로 현재 atlantis의 디렉토리 구조가 어떻게 변하는지 보겠습니다. 현재는 atlantis.db와 bin 디렉토리, plugin-cache 디렉토리만 존재하는 것을 확인하실 수 있습니다.
Git Pull Request - 1
위에서 push한 iam branch를 main branch에 merge하기 위해 PR(PullReqeust)를 생성합니다.

위의 사진처럼 atlantis가 해당 액션(PR)을 trigger하여 자동으로 terraform init&plan을 진행합니다
Atlantis 확인 - 2
위에서 watch 명령어를 통해 관찰하고 있던 atlantis 디렉토리를 살펴보겠습니다.
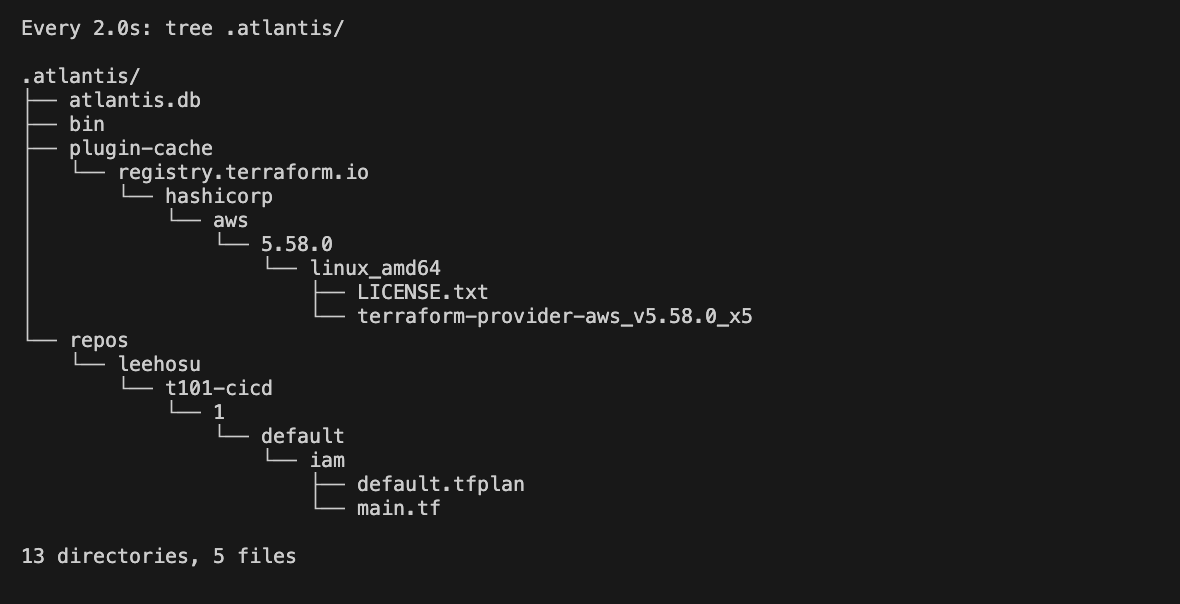
aws 프로바이더가 생성된 것을 확인할 수 있으며 repos에 해당 repo의 작업들이 생성된 것을 확인하실 수 있습니다.
Git Pull Request - 2

그 후 다시 PR을 확인해보면 위와 같이 plan 결과를 보여줍니다.
Atlantis apply
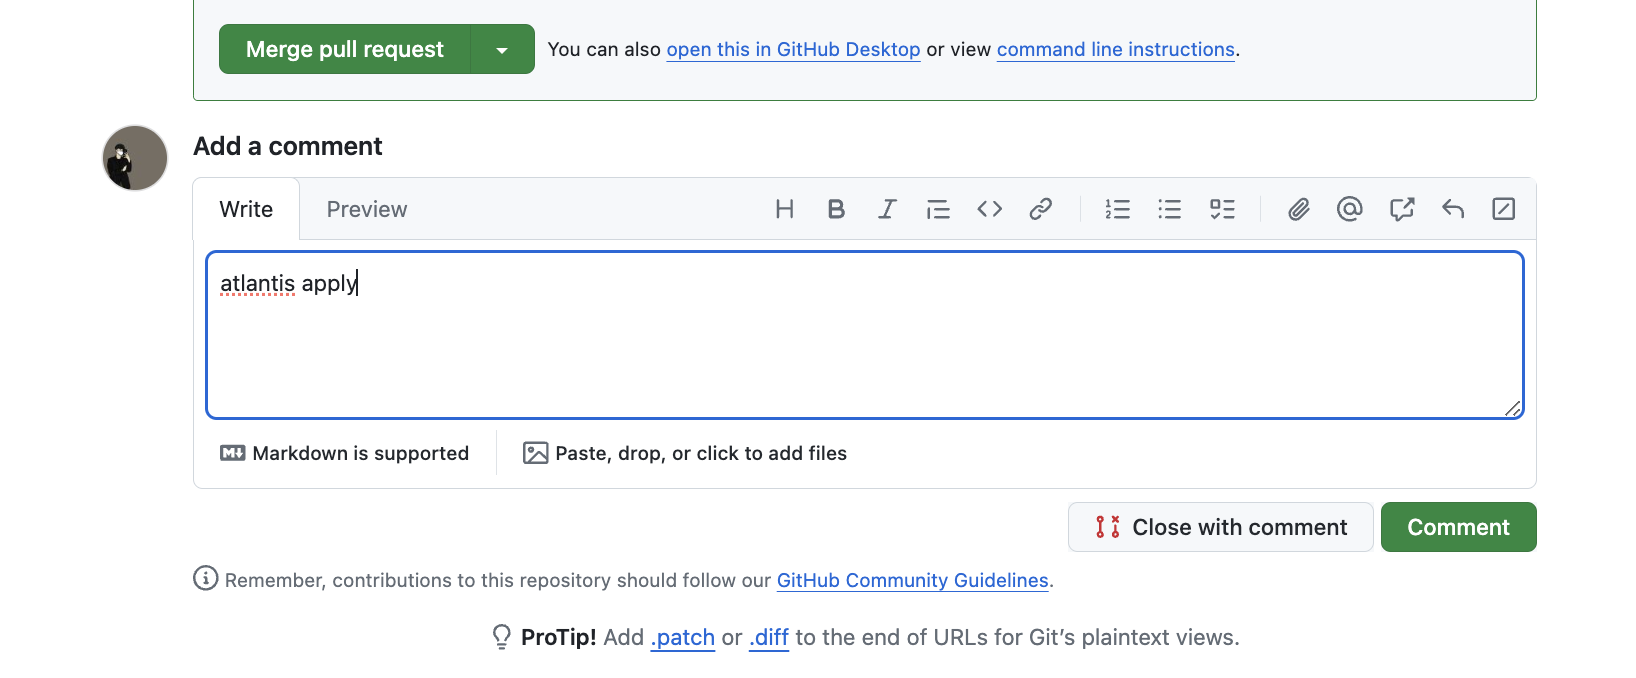
해당 PR에서 comment로 atlantis apply 를 입력하면 자동으로 apply를 진행합니다.

쨔라란~ Atlantis가 apply를 실행하고 결과를 반환해줍니다.
결과 확인
실제적으로 atlantis가 AWS 프로바이더를 통해 리소스를 생성했는지 확인해보겠습니다.
aws s3 확인

AWS S3에 상태저장을 하기 위해 backend로 설정했기 때문에 terraform.tfstate 파일이 해당 bucket에 업로드 되어 있는 것을 확인하실 수 있습니다.
atlantis 확인

atlantis web에서도 해당 결과를 확인하실 수 있습니다.
atlantis destroy
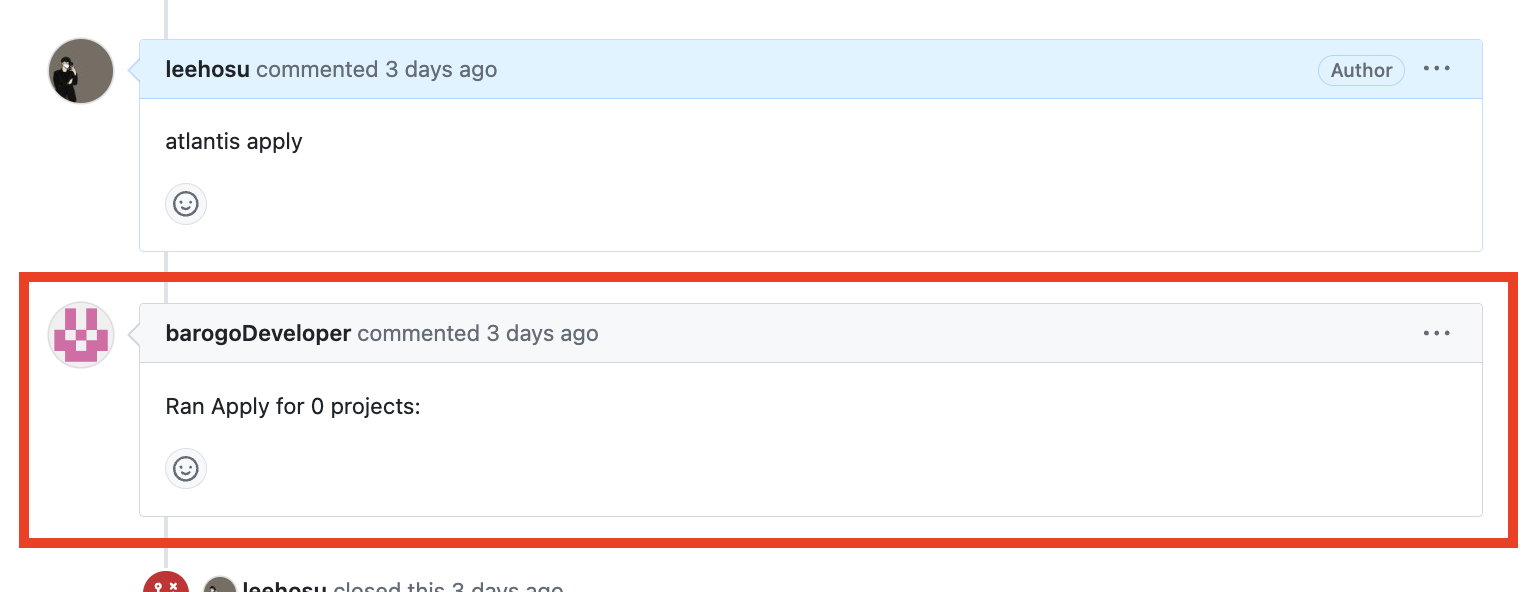
그렇다면 위의 리소스들을 삭제하기 위해서 terraform destroy를 atlantis에서도 수행해보겠습니다.

atlantis에는 version, plan, apply, unlock, approbe_polices 의 명령어만 지원하기 때문에 Error 메시지가 comment로 달리게 됩니다.
'스터디 이야기 > Terraform' 카테고리의 다른 글
| [T101] Terraform - OpenTofu (0) | 2024.08.01 |
|---|---|
| [T101] Terraform - Terraform으로 EKS 배포하기 (0) | 2024.07.27 |
| [T101] 5-1. Terraform - module (0) | 2024.07.09 |
| [T101] 4-2. Terraform - State (0) | 2024.07.04 |


